
Are the Nematodes getting you down? Are the weeds too much for you to handle? Are the fungal diseases turning your garden into a nightmare? Then….
It’s Time To Cook Your Bugs, Weeds and Fungi?
No I’m not talking about a weird meal. I’m talking about solarizing your garden.
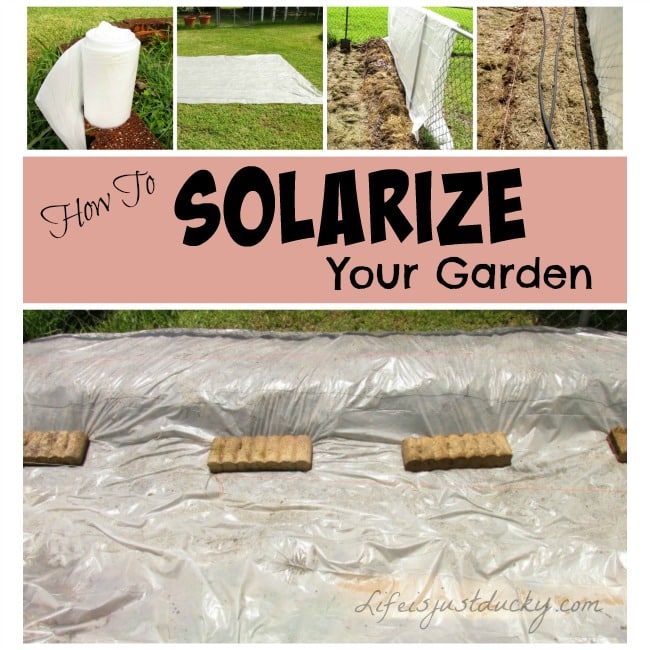
What Is Solarizing?

Solarizing is a simple non-chemical environmentally friendly technique that captures the heat from the sun, and causes it to cook the bad things out of the soil. This leads to a better control or suppression of soil born fungi and bacterial diseases, nematodes and other pests. It also kills many weed seeds and seedlings. In fact it is the only approved nematode control for the home gardener. And anyone who has had to deal with nematodes (tiny worms that feed on the roots of plants) will want to give this a try.
Why Solarize?
Solarizing does many things. It kills off pests, some weeds and pathogens, leaving less stresses for the plants to have to compete with, giving them a head start. The process of solarizing also breaks down organic matter making the nutrients more readily available for the plants to use. Plants often grow faster and produce both higher and healthier yields when grown in solarized soil.
How Does Solarization Work?
Solarization works the same way a greenhouse does. A clear covering lets in, then traps, the suns radiant heat. In this case, a sheet of clear plastic is placed on the soil for 4-8 weeks, usually during the hottest months of the year. Clear plastic is used so the light and heat can go through. I had the great idea the first time I tried it that black plastic would get hotter, and IT did. But it got hotter by absorbing the heat itself. The added heat did not get through to the soil where you want it to go. The sunlight will pass through the clear plastic and be trapped there, heating up your soil and killing all those bad nasties *insert evil laugh here*. Moist soil is best for solarization as moisture helps to conduct the heat transmitting it deeper into the soil. When done effectively, the top 6″ of soil will heat up to 140°. This can reduce the pest population for three to four months, or sometimes even longer, giving your garden a good head start.

How To Solarize Your Garden
1) Where
This works best in full sun. If you have an area you wish to solarize that is in only partial sun, you can do it. The soil may not get as hot and kill all that you wish, but it still may help. You can also leave the plastic on longer to increase the killing potential. If you are in a cooler climate or conditions are not the ideal, you might try a double layer of clear plastic. Put down your first layer, then a few small stones, plastic bottles or PVC pipe you can use as spacers. Not too thick. You want as much light to get through as possible. Then put down a second layer of clear plastic on top. This will give you an insulating layer to help raise the temperature a few more degrees. Solarization can be done on flat or raised beds.
2) When Is The Best Time To Solarize
This works best during your hottest time of the year. In the Northern Hemisphere that would be June, July & August. You can use this technique at other times, but remember, the cooler the temperature and the less direct sun light it gets, the longer the plastic needs to stay on for the desired effect. Highest soil temperatures occur when days are long, air temperatures are high, and skies are clear.
But that’s when your garden is growing! One solution is to solarize one bed a year and work the rest of the garden.
3) Soil Preparation
Prepare your garden beds for planting BEFORE you solarize. This includes all your fertilizer to start your growing season. Your compost, worm castings, and mulch. You do not want to disturb the soil AT ALL before planting, except to make a small hole to put in a seed or seedling. If you stir the soil, you will bring the live organisms back to the surface. Remember they were only killed in the top few inches.
4) Should You Irrigate?
Before you place the plastic on your rows, water them well. To at least 12″ deep. You want the soil good and moist so the heat is conducted deeper into the soil. You also want the plastic touching the soil. If the plastic is raised above the soil, such as from bumpy clumpy clods of dirt, the condensation will accumulate on the plastic, reducing the greenhouse effect. Raise the center of the bed to form a small “crown” to enable the covered bed to shed water. Water standing on the plastic absorbs the heat from the soil.
5) What If There Is A Tear In The Plastic?
A homesteaders best friend. Put a little piece of duct tape on it. A little spot of shade will not make as much difference as the heat loss that will occur through the hole. Or better yet, use clear packing tape.
6) How Long Should You Solarize?
That depends on a lot of issues. How long have you got? Some solarization is better than none. So if you only have a couple of weeks, give it a try. The longer you leave it, and the hotter it is, the better it will work. Optimally, 4-6 weeks in the heart (and heat) of the season. Remember the goal is to bring the soil to at least 140° and hold it there until the pathogens are killed. So the longer you can leave it the better. Solarization is both time and temperature dependent. The cooler the soil temperatures, the longer the plastic needs to remain in place to raise the temperature to the desired levels. The goal is to maintain daily temperatures in the top 6 inches of soil at or above, 110° to 125°F. You can use a soil thermometer or temperature probe to check the temperature if you wish.
7) What To Do After You Solarize
Remove the plastic film and you are ready to plant. Remember you prepared the garden for planting before you solarized, so you are good to go!

8) Beneficial Soil Organisms
Although many soil pests are killed by solarization, many beneficial soil organisms are able to either survive solarization or recolonize the soil very quickly afterwards. Some of these beneficials are mycorrhizal fungi that aid plant growth. Many organic complete fertilizers now contain this and, to give an added boost, it can be top dressed beside the new seedlings after they come up and are established. (see link below) Also earthworms are thought to burrow deeper into the soil to escape the heat. You can also give this a boost by using your worm towers. I will add a handful of new worms from my worm bin and feed them all well. Happy worms, happy garden.
9) Solarize Your Container Garden Too
What if you garden in containers. Soil in containers or cold frames can be solarized too. Soil can be solarized either in bags, plastic buckets or flats. Place the containers on an elevated surface like a wooden pallet. Then tent them with garbage bags or transparent plastic that you have sealed. Done this way, even black plastic bags can raise the temperature up to around 160° F. Placing them on pallets allows for heating from all sides. If your container is small enough the whole container can be put into the black trash bag and placed on the pallet. Remember to moisten the soil before you begin. Because you are able to solarize the whole thing, You only need to keep the temperature at around 158° F or higher at the coolest spot, for 30 minutes, or 140° F or higher for one hour.

Where Can I Learn More About Natural Disease, Pest and Weed Control
Check out these books for even more information. Also check out this thermometer for monitoring the soil temperature and this source for mycorrhizal fungi too.
Solarizing Is Not A Fix All
Solarizing does not kill ALL fungi, bacteria or weeds. It generally kills the weed seeds and the seedling, but the weed growing from a deep rooted rhizome it will not control. Check out this post on other ways to control those weeds. Nematodes will still be in the soil at a lower level. But they will take time to crawl back up to the surface. So this procedure of solarizing will have to be repeated each year for continued results. But anything that can make our jobs easier in the garden is certainly worth the effort.
Now Have a Ducky Gardening Day!

Mary is a gardener, backyard homesteader, and duck wrangler. She is also the owner and writer of LifeIsJustDucky.com and AGoodWordADay.com. (for daily devotions) Mary is passionate about helping others expand their backyard homesteading skills and learn to be more self-sufficient, no matter where they live.


“Check out these books for even more information. Also check out this thermometer for monitoring the soil temperature and this source for mycorrhizal fungi too.”
WHAT books? No links or titles
Carol, My apologies. The link disappeared and I missed it. Here is a link for you to check out. I’ll fix the post the first chance I get. https://amzn.to/3PQvjKC
Addition of properly Aerated Compost Tea immediately after solarizing can get the beneficial microbes into the area that was just wiped clear of microbial life. In class I give the example of a parking lot with only so many spaces: if you get the “good cars” parked and fill up the parking lot, any “bad cars” that may pass through don’t find a parking spot and move on to the next lot. One recipe we use that did really well this year is 16-18 0z each of EWC, Mushroom compost for mychorizal properties, and composted cow manure in 4.5 gallons of RO water, but the ticket was the unsulphured molasses for the “Bennies” to feed on and thereby have exploding and optimal populations at 24-30 hours.
Good point. Covering with mulch is something I should add too. Thanks for the suggestion.
What is EWC?
EWC is shorthand for Earth Worm Casting. When you raise earthworms, this is the poop they leave behind. It is the BEST fertilizer. Check out this post to learn more about raising worms. https://www.lifeisjustducky.com/raising-worms/
Hi.
One question. I have recently bought fertilized mud for my tiny 10-12 inch deept pots in a balcony from a local nursery. (I couldn’t visit my regular guy due to lockdown). The mud seems to have enough Nematodes in them. I plan to transfer the mud into tiny 4-6 inch deep polythene bags (transperant) and leave it under the sun. Will this help kill all nematodes 100% nd how long long will this take. I live in india, Mumbai.
Nematodes are very hard to kill. I have seen it suggested to put it in a black plastic bag, get the soil wet, and seal it up. Leave it in the sun and let it bake for two or three weeks. That should kill most of them. I’m not sure if it takes care of 100% or not, but it’s your best bet. There are also “good nematodes” that kill bad ones. I’ve never used them and don’t know much about this process. But you might want to look into it. Good luck to you.
You’ve explained this so well! I’m just confused on one thing though–and that probably only because I’m such a noob. If the best time to solarize is in the hottest months, isn’t it too late to plant after? I thought planting for most flowers and veggies is done during the spring months?
I realize this is a conundrum. One solution may be solarize one area and plant another. When one crop goes out, solarize. Or, not optimal but, solarize at the end of the season, just leave it a little longer. I have an advantage here. In zone 10 (which I’m in) we grow from September to the end of March. We can’t grow much in the summer anyway. But boy do we need to solarize!