Hatching duck eggs can be fun, educational, and result in adding healthy ducks to your backyard homestead.
Starting or increasing your backyard flock of ducks can take several forms, but one of my favorites is hatching eggs in an incubator.
You can increase your hatch rate by learning what your duck eggs need.
Hatching duck eggs is similar to hatching chicken eggs, but there are a few important differences that you need to know to ensure success.
This article will help you understand the incubation process and improve the number of eggs that hatch.
Note: Read the whole article before you begin so you don’t miss any important steps.
This post may contain affiliate links. I will be compensated if you make a purchase after clicking on my links. Please read my disclosure if you have questions.
Thank you for supporting this site with purchases made through links in this post. For Starters Here’s My Amazon Link.
Getting Started Hatching Duck Eggs
There are several ways to increase your flock of ducks.
You can get ducklings from a hatchery or a local farm.
You can buy duck hatching eggs and let a broody chicken hen sit on them.
Or if you are really lucky and have a broody duck, you can let her hatch her own eggs. But one of the easiest ways is to get eggs, either from your own ducks or a hatchery, and put them in an incubator to hatch. That is what I chose to do.
There are several ways to increase your flock of ducks.
- You can get ducklings from a hatchery or a local farm.
- You can buy duck hatching eggs and let a broody chicken hen sit on them.
- Or if you are really lucky and have a broody duck, you can let her hatch her own eggs.
- But one of the easiest ways is to get eggs, either from your own ducks or a hatchery, and put them in an incubator to hatch. That is what I chose to do.

Things To Think About Before You Begin
Choose The Right Ducks
Ducks are great additions to your backyard homestead. They are great at laying eggs, they are wonderful for bug patrol in the garden, they can be a source of meat for your table, and are the most fun to watch waddle excitedly toward you when you bring them treats.
Picking the right duck breeds with the right traits for your homestead can make your experience with poultry even better.
Too Many Males
Duck hatch rates are pretty close to 50% male to female. You should only have 1 male per 7 or so females.
There’s no way to sex eggs prior to hatching, and too many males can cause problems down the road. You need to decide now how you will deal with the extra males.
I will send mine to freezer camp, but everyone is not willing to do that. So, I want you to be aware of this possible problem before you begin.
What If All The Eggs Didn’t Hatch
All the eggs not hatching is very normal. So don’t feel bad if all your duck eggs didn’t hatch. The average hatch rate is 45% – 60%. Even the hatcheries that have the best equipment and years of experience, only have about 85% hatch rate.
So be proud of all the ducklings you got to hatch, don’t give up, and try again next time.
Female Ducks Are Hens
Sometimes, in this article, I mention hens, this will mean female ducks unless I specify chickens.
Why Use An Incubator
Unlike chickens, domestic ducks seldom go broody. With the exception of Muscovy ducks, the broodiness has been bred out of most of them.
Why would they want to breed that out of them?
If your hens don’t go broody, you get more eggs because hens stop laying while they are sitting on eggs.
Also, sometimes, a hen will stop sitting part way through the incubation period. If your hen (chicken or duck) decides she doesn’t want to sit anymore, you are out all those ducklings (and all the eggs she would have laid during that time), and you need to start again.
With an incubator. You are ensured a good hatch rate, with no attitude. (broody hens can get mean)
Getting Fertile Hatching Eggs
If you have a drake and a hen, you will have fertile duck eggs you can hatch. If your flock is not very large, you can save them up for a few days until you have the quantity of eggs you want.
How do you store eggs before incubating?
The ideal temperature for holding eggs is about 60° and 75% humidity. Store eggs small end down. A refrigerator is too cold. In some homes, a basement is an ideal place to keep them for a few days.
How long can fertilized eggs sit before incubation?
At the optimal temperature, you can keep hatching duck eggs for up to 10 days before incubation, but the longer you save them, the lower the hatch rate will be.
My house is warmer than 60°F (15.5°C), so I chose to only keep mine for 5 days before I started incubation.
The eggs will only start embryo development when the eggs are rewarmed to the correct temperature. That is how they will all be ready to hatch at the same time.
Related>> 12 Things You Need To Know Before Raising Ducks.
Collecting Your Eggs To Hatch
Before you begin collecting your eggs to incubate, you will want to wash your hands. You do not want any bacteria affecting your little babies to be.
In fact, you should wash your hands before and after you have any contact with your hatching eggs – every time.
You will also want to choose a mild day to collect your eggs. You don’t want it to be too cold as frozen eggs will not hatch.
Let the eggs rest for about 12 hours at room temperature before placing them in the incubator. This helps them to not have a temperature shock when they are placed in the warm incubator.
When you choose hatching duck eggs, make sure the eggs are of normal size. You don’t want to choose eggs that are much too small or so large they will likely have a double yolk. (these seldom survive). You also don’t want a shell-less egg or any other deformity.

Don’t Wash your Duck Hatching Eggs
When collecting the eggs, choose the cleanest eggs you can. Ducks are known for having messy eggs, but with a properly cleaned nesting box with fresh bedding, they shouldn’t be too bad. Discard any you find in the mud.
Don’t wash them. Eggs have a bloom on them. A bloom is a coating that the bird coats the egg with when they are laid. This bloom helps keep bacteria out of the egg. You want that to stay intact.
This bloom will gradually disintegrate and will help the egg regulate how much air is getting into the egg and how much moisture is getting out.
If there is a small amount of dirt on the egg, you can take a paper towel and brush it off so it is mostly clean.
What If Your Eggs Came In The Mail
If you are just getting started with your first ducks, or you want some new genetics, you can get duck hatching eggs from a hatchery and have them shipped through the mail.
You will be called to the post office to go pick them up. When you get them home and open them up, let them sit at room temperature, pointy end down, so they can come to room temperature.
This will let the yolk settle to the center. They have likely had a bumpy ride. Leave them that way for about 24 hours.
Can You Hatch Chicken And Duck Eggs Together
You will have a much better outcome if you do not try to incubate chicken and duck eggs together.
There are a few differences in hatching Duck, Muscovy, and Chicken eggs, one is that the duck egg hatching time is different. Duck eggs take 28 days to hatch. (The exception is Muscovy duck eggs hatching at about 35 days)
Chicken eggs only take 21 days to hatch. So just at the point that you are about to lock down your incubator with duck eggs and not open it, your chicks would be hatching.
Another difference is the humidity. Duck eggs need to be incubated at a higher humidity than chicken eggs.
What Type Of Incubator Do You Want To Use?
A mother duck will turn her eggs several times a day to make sure the outside eggs are as warm as the inner eggs. She will also go take a bath and come back to the nest all wet. This will help you understand why an incubator needs the things that it does.
There are many incubators on the market. They can range in egg capacity from 2 to a couple of thousand. Mine does a dozen duck eggs nicely and that is adequate for most people.
Make sure the one you choose is large enough for duck eggs. Most of them have automatic turners, but the slots can be too small for duck eggs, which keeps them from turning.
It is recommended that the eggs be turned 3 -7 times a day. (always and odd number) An automatic turner is not a necessity, as they can actually do better if turned more often than what an automatic turner operates. (most turn 3 times a day) But that means you have to be the turner….several times a day….every day….for 25 days. I think the automatic turner is just fine for my needs.
Some of the professional turners rotate the eggs end over end. This is not correct for duck eggs. They do better just if they are rolled. They should be turned 180° at a time. (top to bottom or bottom to top)
They should also have a digital readout for temperature and humidity. The humidity needs to be kept higher for duck eggs than chicken eggs.
Some brands are more reliable at keeping accurate temperatures and humidity. Check the reviews. Mine has high marks for accuracy.
The one I use is The Nurture Right 360 incubator. We have hatched both chicken and duck eggs with this unit and have had great success. It’s turning slots are large enough for my duck eggs which is a must.
Hatching duck eggs in an incubator takes very little time daily to take care of a clutch of eggs and it’s easy to use and clean up afterward.
It isn’t the cheapest incubator, but I love that it works well and is from Harris Farms, which is based in Tennessee.
Before Putting Your Eggs In The Incubator
Various types of incubators work slightly differently, so it’s important to read the instruction manual before you begin
Clean your incubator, then set it up and preheat it before you put your eggs inside.
It is important to set up your incubator at least 24 hours before putting the duck eggs into your incubator. This allows the incubator’s temperature and humidity levels to stabilize to give you the best chance of hatching your duck eggs.
Place your incubator in a room that maintains a constant temperature, is free from drafts, and away from direct sunlight. Also, make sure that your incubator is located where children and pets will not bump or disturb it.
Proper Temperature And Humidity For Duck Eggs
It takes 28 days on average for duck eggs to hatch. The temperature and humidity requirements for hatching ducks are as follows:
- Temperature for hatching duck eggs, should be set between 99.3°F (37.3°C) and 99.6°F (37.5°C) for day 1 – day 25 incubating period. Lower it to 98.5° (36.9°C) for days 26 – day 28
Lower it again to 97° (36.1°C) when they start hatching
- Humidity should be set at 55% – 60% for day 1 – day 25 of incubation.
Raise it to 65% – 70% for days 26 – day 28. As the ducklings prepare to hatch.
Raise it again to 80% when the ducklings start to pip.
The correct humidity levels during incubating and hatching are much more important for waterfowl than they are for chickens.
Without enough humidity, ducklings tend to become “shrink-wrapped” when the shell membranes dry up, restricting the duckling’s movement within the shell.
If this happens, the duckling becomes stuck inside the shell and won’t be able to get out.
If the humidity is too high, the air sac will be too small and the ducklings will have trouble breathing while breaking out of the shell.
Most incubators will have a reservoir for you to fill with water. This is what keeps the humidity level up. You will have to adjust when you fill it to make sure the humidity does not go too low nor too high. You want to keep it as consistent as possible.
- Ventilation: Make sure the ventilation system in the incubator is working well. Even during lockdown, the right flow of air is needed to bring in fresh oxygen and get rid of carbon dioxide.
Having a really good incubator that automates as many of these processes as possible will make your life a lot easier and your hatch rates a lot higher.
Related>> 300 Good Duck Names For Your Backyard Flock.
Why Should You Candle Eggs
Before putting your eggs into the incubator, they need to be candled.
Candling merely means shining a beam of light through the eggshell. Originally a candle was used to do this, but now we use a powerful flashlight, or many incubators have a candling light right on top.
You will be candling your eggs a few times over this incubation process.
- Cracks: The first time you check is before you put them in the incubator. You will want to check each egg for cracks.
This is especially important for eggs that have been shipped through the mail. You can use softened beeswax to seal any minor cracks. Some can be so small you won’t notice it until you candle them. If there are large cracks, the egg should be discarded.
Later on you will be checking for:
- Infertility: Some eggs were never fertilized to begin with and you will see no development.
- Blood Ring: A blood ring occurs during the incubation of the eggs when the duckling begins to develop but then dies. When there’s a blood ring, rather than the spider web pattern you’ll see a dark line running around the circumference of the egg.
- Cloudy Eggs: This is a condition where the embryo started to develop and then died
If you see any of these three, the egg needs to be discarded as it can rot and explode, contaminating the other eggs.
Healthy blood vesicles look like a spider web.

How Do You Candle Eggs
Pull the blinds or wait until it is dark so you can easily see the illuminated egg. Carefully place each egg on top of the light, letting it shine through the egg.
Work quickly and don’t leave the light on the egg for too long. You want to get them back into the incubator and to the correct temperature as quickly as possible.
I like to candle my eggs before putting them in the incubator the first time to check for cracks, and at day 7, and day 14 to make sure there is embryo growth. If there is not, you want to discard the eggs so they do not spoil, explode, and contaminate all the other eggs.
Marking your Duck Eggs
You can mark each egg with a pencil.
Mark all of them on one side. The mark serves as a reference for daily turning.
That way you can keep track of whether your eggs are being rotated properly. And if you have an incubator that does not turn them for you, you will be able to see which ones you have turned.
That’s especially important if you get interrupted in the middle.
Turning your Duck Hatching Eggs
If your incubator comes with an automatic turner, you should still check to make sure it is working with your duck eggs.
Since duck eggs are larger, they could get stuck in the tray and not be able to turn.
But if it doesn’t work as it should, all is not lost, just make sure you set an alarm and turn them yourself. Duck eggs should be rotated sideways 180° at least 3 times a day.
You can turn them more often. 5 to 7 times a day is what some like to do. Always turn them an odd number, that way each night the embryo is spending the night on the opposite side of the egg.
This will keep the embryo centered in the egg.
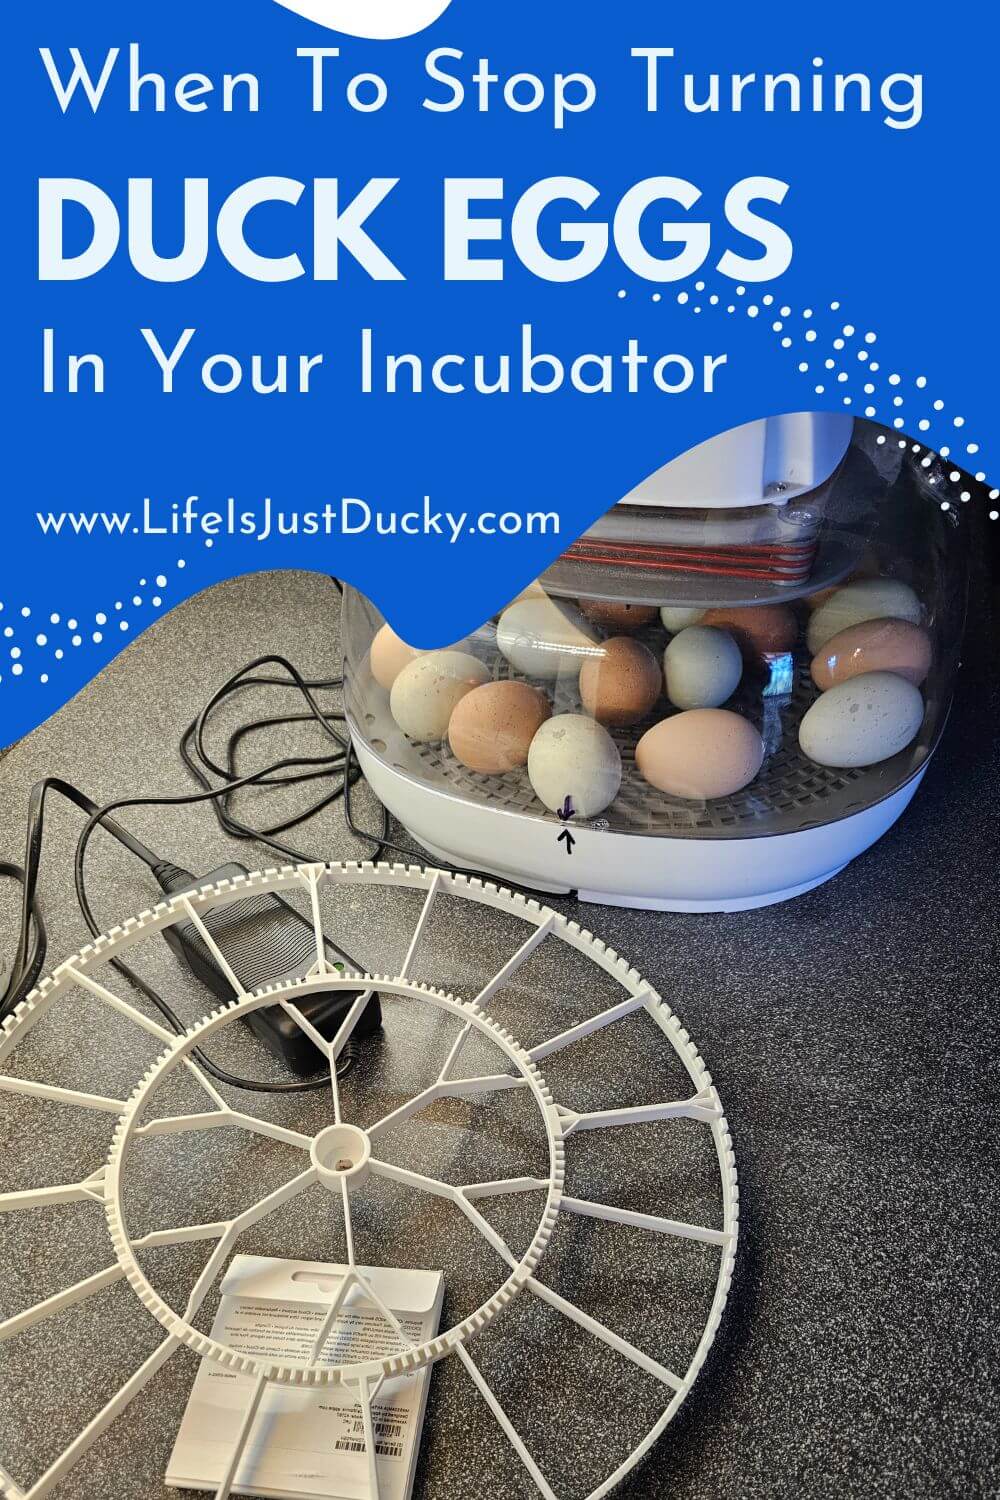
You should turn your duck hatching eggs every day until day 25.
In an incubator that turns your eggs, that means at day 25 you will need to remove the insert that causes them to turn.
Check your instruction book to see if your incubator is different.
Photo of Insert out of the incubator.
Talk To Your Eggs
This one may sound silly, but studies have shown that ducklings will start to recognize your voice and will bond to you from inside the egg.
If you want friendly ducks, this is a great way to start them off trusting you before they even hatch.

Daily Guide to Hatching Duck Eggs
Let’s break it down to an easy day-by-day care list.
(download this calendar to help you keep track)
Day 1
- Mark the schedule on the calendar so you won’t miss any steps.
- Candle your eggs and make sure there are no cracked eggs.
- Mark one side of your eggs.
- Make sure your eggs are turning properly.
- Check heat and humidity to see if they are staying consistent.
Day 2 Through 6
- Check your eggs to make sure they are turning properly.
- Check heat and humidity to see if they are staying consistent.

Day 7
- It’s time to candle your eggs.
- You can mark the level of the air sack so you can know if it is increasing.
It’s amazing how much has already started developing by day 7.
The blood vesicles are spreading out in a way that reminds me of the static electricity machine that makes your hair stand out when you touch it. (Van de Graaff generator)
If you don’t see this, your egg should be discarded as it probably wasn’t fertile.
Development: Its eyes, ears, and major organs have started forming. Now would be a great time to start talking to them.
Related>> What to Feed Ducklings For Happy, Healthy Baby Ducks.
Day 10 Through 25
- Misting and Cooling your Duck Eggs
Momma ducks do not stay on their nest every minute of the day for 28 days. They leave the nest to eat, drink, swim, poop, and take a short break.
Thus, duck eggs are especially adapted to deal with these breaks. During this, the eggs cool off and then get re-warmed by a warm and newly-wet momma duck.
That’s why many duck breeders recommend mimicking this cooling and misting cycle. It has been found to increase hatching rates.
Eggs should be cooled and misted from day 10 to day 25
Cooling your Duck Eggs
It is recommended that before misting your duck eggs, you remove the lid of the incubator (or remove the eggs from the incubator) for about 15 to 30 minutes every day starting at about day 10 of the incubation period to let the eggs cool slightly.
If you remove the eggs, make sure they stay upright and not roll around, so you are not changing where the egg is in the turning schedule.
How To Mist Your Duck Eggs
Warm the water to about 100°F (37.7°C). Put this in a spray bottle and mist the eggs. This draws out moisture from the eggs and promotes the growth of the air sac, which gives the growing embryo room to expand.
Why warm the water instead of using room temperature water?
Misting with cold water will actually cause bacteria to be drawn in through the porous shell (since the hatching eggs aren’t washed) which can kill the embryo. Warm water will repel the bacteria.
In fact, using cold water is how ducks and chicks can be inoculated while still in the shell.
So, it’s very important to use warm water when misting your eggs.
I heat some water in my microwave. Let it cool to 100°F if you get it too hot.
You also may be able to use your hot tap water. Most hot water heaters (in the US) are set at 120°F.
Day 14
- It’s time to candle again.
You will see so many more changes to your embryo, and the air sac in the blunt end of the egg will have grown larger.
This holds air that the duckling will breathe before it breaks out of the shell on day 28.
Development: Wings have a joint, down covers most of the body, the egg tooth is present.
Day 25
- Today is the last day to cool and mist the eggs.
- You can candle one last time if you like. It will be mostly dark because it is filled with the duckling, except for the air sack.
Day 26
Today is lockdown.
- In the morning, remove the divider that makes the eggs turn. This allows the duckling to get into the hatch position.
- Lower the temperature to 98.5°F (36.9°C)
- Increase the humidity to 65 – 70%
- Open the vent fully to let more oxygen into the incubator for the ducklings to breathe.
- Keep the incubator lid closed until the ducklings hatch, have dried off, and are getting active and indicating that they are ready to be transferred to the brooder.
This will keep the heat and humidity consistent. Humidity for hatching duck eggs needs to be high in order for them to be able to get out of the shell.
Development: Ducklings will begin to communicate with each other by clicking, encouraging each other to hatch. If the mother was hatching them, she would be clicking too, this is how bonding occurs, so make sure you are talking to your eggs.
Getting Ready to Hatch:
- Get the incubator and anything else you need ready for the ducklings to come.
- You should have a brooding area ready for them to go to when they are dry and active.
- You might want a small basket to transfer the duckling from the incubator to the brooder.

Day 25 – 28
The Ducklings Will Pip
- At the first sign of the pip, increase the humidity to 80%
The first sign of hatching is the “pip”. The pip is a small hole that the duckling breaks in the eggshell at the rounded end, (the air sack) so they can breathe better.
This usually happens on day 28, but could occur a day or two earlier or even later.
Once the duckling has broken through the membrane and shell and is breathing the air in the incubator, it will often rest, sometimes for hours or even a couple of days.
Hatching takes a lot of energy and is a slow process, so don’t panic and don’t try and help the duckling out of the shell! You can tear blood vesicles and the duckling can bleed out.
If it’s day 30 and you have weak or bleeding ducklings still not out of their shell, that’s a sure sign your humidity was too low.
The Ducklings Will Zip
The next stage is the zip. The duckling will crack a straight line around the perimeter of their egg shell. This will make a “door” for them to exit the shell.
They have a special bump on the top of their bill called the “egg tooth”. This is what they use to break through the shell. Soon after hatching, the egg tooth will fall off.

The Ducklings Are Hatching!
The process of duck egg hatching is very slow.
Once they start pipping their eggs you don’t want to open the incubator.
As tempting as this is, it’s very important, since the humidity level in the incubator will drop each time it is opened, so you want to leave it closed as long as possible.
Besides, hatching is very tiring and ducklings just need to rest after they hatch. They can stay in the incubator for up to 24 hours. That way all or at least most of the eggs will be hatched.
Don’t worry. Ducklings absorbed the last of the yolk just before hatching so they don’t need food and water immediately.
Moving the Ducklings to the Brooder
When you do open the incubator, you will want to transfer the new ducklings to a nice warm brooder, with food and water.
Clean Up
After all ducklings have hatched and are moved into the brooder, make sure to thoroughly clean and disinfect the incubator and all parts following the manufacturer’s directions. A 1:10 bleach/water solution is ideal for sanitizing. Then pack it away, with the instruction book for next time.
Yeah!
Your ducklings are hatched and you are a new duck momma or daddy. Congratulations!
Now it’s time to learn more about keeping happy, healthy ducks.
So check out these other classes and articles:

More You May Enjoy
The Simple Start Raising Ducks System.
Setting Up A Brooder Box For Baby Ducks.
A Well Designed Duck Coop To Make Your Life Easier.
Duck Eggs vs. Chicken Eggs, Why Duck Eggs Are Better.
Raising Ducks 101 – How To Take Care Of Baby Ducklings.
How To Get Clean Water For My Ducks.
Happy Backyard Homesteading!

I believe everyone can grow at least part of their own food! Let me show you how.